How to Use the Foam Roller for Runners

Thursday, 5 November 2009  |  Gear + Gadgets

After our TRX Suspension Trainer Seminar, Coach Jim Saret arrived to discuss a product that I believe all runners should have: the foam roller.

The foam roller is a product that I searched far and wide for during my ITBS days earlier this year.  I had done extensive research on stretching and loosening up my tight ITB muscles and I learned that the foam roller could be a good ally in the battle against ITBS.  Unfortunately, to my knowledge, it wasn’t available locally.  

I did the next best thing. I wore my Martha Stewart hat and proceeded to create my very own foam roller.  I bought a PVC pipe at the local hardware store, cut up my old yoga mat, wrapped it around the pipe twice, and voila, I had a foam roller that was a quarter of the cost of the original!  I foam rolled on my ITB thrice a day.  A couple of days later, when I paid a visit to my doctor, he looked at my black-and-blued thigh in horror and said “What have you been doing?!”  I replied proudly, “foam rolling!”  He advised me to stop it unless I got a real foam roller, which was probably 10x softer.  So much for resourcefulness!

So, here I was in the gym.  This time, with the real foam roller in my hands (yes, it was a lot softer than my PVC pipe or a rolling pin…duh!) and, even better, one of the most sought after coaches was right before me to teach me how to use it!

It’s very simple, really. Here are tips from Coach Jim on how to use the foam roller effectively:

1. Place hot compress on the area or warm up with jumping jacks or easy run.
2. Foam roll on the area:

ITB: lie sideways and slowly move up and down the upper thigh (Click here to view the You Tube video I followed during my ITBS days. A quick search in youtube will provide you with enough demos to guide you on proper use)

IMG_1771
– Hec demos foam rolling on ITB. Tongue exercise need not be followed. For progression, you could lift both legs off the floor –

CALVES: sit up with legs outstretched and foam roller under the calves. Variations: foot outward, inward, straight

IMG_1768
– Mitch Felipe rolls on her calves, muscles that get extremely tight for runners –

QUADS: face downward and place foam roller under the quads

IMG_1769
– Coach Jim rolls on his quads –

3. The slower the movement, the better.
4. Run.
* You can also perform the exercises anytime during the day.

PREVIOUS POST: TRX Suspension Trainer Seminar 
NEXT POST: Coach Jim Saret on Core, Stability & Strengthening for Runners (Best brief talk I had ever been to for runners!)

Foam rollers are available at Chris Sports.

TRX Suspension Trainer Seminar

Tuesday, 3 November 2009  |  Gear + Gadgets

It was back to school for me last Thursday morning. Only the school was a gym. And, my classmates were athletes, such as Pinoy Ultra Runners’ Neville, Second Wind’s Hector, and super fit Mitch Felipe-Mendoza, columnist for Phil. Daily Inquirer. Last but not the least, instead of seats and desks, we were half-suspended in air most of the time.

I took a TRX Suspension Trainer Seminar offered by U.S. Certified Instructors, Gilbert Tang and Coach Jim Saret. Gilbert taught us all the exercises we could perform using TRX Suspension Trainer, while Coach Jim gave us a brief talk about running and introduced the use of the foam roller. The half-day talk was fun, informative, and (gulp) completely exhausting.

IMG_1780
– Class pic: Lisa Tang, Mitch Felipe, Neville Manaois, myself, Gilbert Tang, Joseph Pagulayan, Coach Jim Saret, and Hector Yuzon –

TRX Suspension Training develops functional strength while improving flexibility, balance, and core all at the same time. I’ve been using the TRX for over a month now and here are the benefits I see for runners:

  1. Functional exercise. It doesn’t isolate muscles, but uses a whole range of motion. In other words, it doesn’t strengthen just one muscle group but builds optimal strength and performance.
  2. Core is used all the time. No matter what exercises you do using the TRX, the core is working all the time. For runners, a strong core is vital to maintaining your running form especially for long distances.
  3. Adjustable intensity. One can progress from easy to hard workout just by changing the resistance levels and position (stability).
  4. Quick workout. It takes as little as 25 minutes to get a good workout.
  5. Can be used for stretching. I got some good stretching using the TRX, none that I could do on my own.

Hec3
– Nevs and I looping the handles for single-hand exercises. Very serious work! –

Hec4
– Gilbert teaches us how to do the TRX squat and single-leg squat. Great exercise for runners –

IMG_1749
– Mitch and Hec doing the chest press to strengthen triceps, shoulders, and core. Yeoouch! –

IMG_1735
– Neville and Mitch doing the deltoid fly for strength and stability in the shoulders. Nevs, don’t forget to breathe! –

IMG_1734
– Demo of the single leg chest press. None of us attempted to do this. –

IMG_1732
– Gilbert assists Hec as he does his suspended prone planks –

The next day, my body was tired and sore all over. It made me feel a wee bit better when I heard that the Pinoy Ultra Runners felt the same!

For those interested in taking this seminar, click here. TRX Suspension Trainer is available at Chris Sports. More info here.

NEXT POST: Coach Jim Saret teaches us basics on running and how to use the foam roller.  It was, by far, the most informative talk I ever heard on running.  And, you know that I’ve been to a lot.

* Thanks to Hector for some of the photos.

TRX Suspension for Runners

Tuesday, 8 September 2009  |  Gear + Gadgets

Remember I told you about my new toy, the TRX Suspension Trainer? It’s been giving me such a great strength training workout the past weeks that I’ve skipped the gym hoping that my personal trainer thinks I’m still in Oregon.  (Wait until he reads this)  

A couple of days ago, a friend sent me this great link on using TRX to develop flexibility for runners.  Click here.  A-m-a-z-i-n-g.  It couldn’t have come at a more perfect time as my Polar RS800 is now giving me info on stride length and cadence (yes, I know that I’m below the ideal 90 rpm based on my Hood to Coast data).  At least now I know how to use all this newfound info to improve my performance!  Now, if only I could find more time to train…

————————————————–

For fitness professionals out there who are interested in learning how to use the TRX for yourself and your clients:

TRX Suspension Training Course (STC) Level 1

Get the basics of using your TRX Suspension Trainer for yourself and your clients. This expert-led course gives you the essential information and hands-on training you need.

Date: September 12, 2009 (Saturday)
Time: 8:30am to 4:30pm
Venue: Pinnacle Health Pointe (aerobic studio)
Address: #36 Triple A Health Plaza Building, Scout Torillo, Quezon City (near Timog)
Telephone: Pinnacle tel. 920-1565 / 413-4791 (pls call for directions only. other inquiries regarding STC course should be coursed through Chris Sports office) Chris Sports 4128768/ 9247964. look for joan.

Price: P6500.- / P6,000 (with purchase of TRX from Chris Sports. proof of purchase is required)

Reservation: Required. Limited slot to 10 participants.

Payment: Full payment is required upon reservation. We apologize but we cannot accommodate reservation until fully paid to give way for confirmed participants. Pls. deposit at BDO account name: Engelbert Tang Account no. 1150042166 . Pls fax deposit slip with your name at 9247964.

Instructor: Gilbert Tang/ Jim Saret, U.S. Certified TRX Instructor

COURSE DETAILS

  • Learn to maximize the benefits of the system and how to perform all exercises safely and correctly. This eight-hour, hands-on course explains and demonstrates set-up in a wide variety of locations, and teaches comprehensive use of the TRX Suspension Trainer so it’s an efficient, effective, and stimulating exercise tool for you and your clients of all levels. It’s the edge top fitness pros need. After completing the STC you will be able to:
  • Properly set up and use the TRX Suspension Trainer in a variety of locations and for a wide variety of exercises.
  • Use the TRX as an efficient and effective exercise tool regardless of your fitness level or performance training goals.
  • Safely and effectively train different client populations with optimal results.
  • Understand why Suspension Training is a unique and valuable training method for sports performance and general fitness.

PRODUCT DISCOUNTS: All attendees can buy a TRX at the STC for a special price of P6950.- PLUS, all TRX training programs will be available for a 20% discount the day of the course. We encourage you to inform us early if you are purchasing to make sure we have the stock on hand at the course venue.

COURSE MATERIALS: You will receive a Suspension Trainer Course (STC) Manual the day of the course. It is not required that you review this information prior to the course.

My New Toy: Polar RS800CX Pro Team Edition

Wednesday, 19 August 2009  |  Gear + Gadgets

I never did get back to you regarding my choice between the Polar RS800CX and the Garmin Forerunner 310XT.  Reason being, it took me a full three months to decide on my next running watch purchase.  With a purchase this costly, I made sure I did my research comprehensively. 

I spent hours upon hours of research on both watches.  You name it, I read it: articles on Runner’s World, online reviews and forums.  I interviewed (read: harassed) both loyal Polar- and Garmin- users about the pros and cons.  I tested the Polar for a week (which was not long enough!) and devoured as much info as I could get my hands on regarding the new Garmin Forerunner 310XT.  At the end of most days, I would lie on my bed wanting to pull all my hair out.  All the research left me even more confused.

You see, all readings and research led me to discover this one truth: both brands come highly recommended.  It was much like choosing between a PC and mac, McDo and Jollibee, or Piolo and Jericho.  (Okay, scrap the last example since Marc Nelson wins hands down.)  The Polar RS800 has a slight edge as it’s been tested by more athletes compared with the new Garmin 310XT.  But, basically, both have their own strengths and weaknesses.  It all depends on the user to determine which watch would fit his/her needs more.

After all this research, I devised a rather simple guide to help you determine which watch is for you:

GET A GARMIN if…
– you want GPS-based readings
– you’re not a techy (Garmin is very user-friendly)
– you’re more of a runner than anything else

Choose the GARMIN 310XT ($400) if…
– you swim
– you’re in need of longer battery time (say a marathoner or ultramarathoner)
– money is of no concern.  It’s pricey for minor upgrades from the Garmin Forerunner 305

Choose the GARMIN FORERUNNER 405($300 Amazon) if…
– you need a regular watch too
– you don’t mind using bezels (I do!)

Choose the GARMIN FORERUNNER 305 ($165 Amazon)/205 ($154) if…
– you need an simple, affordable, and accurate running watch

* Note: My hubby uses a 405.  I don’t like it since I find the bezel too sensitive and the screens are much more complicated than the 305.  I would opt to purchase another 305 (in my humble opinion, still the best for Garmin) than the 405.

GET A POLAR RS800 (price ranges depending on the model, P25,000 to P30,000) if…
– you run and swim (it’s waterproof) or you plan to get into triathlon
– you need a regular watch
– you train using heart rate (this is what Polar is known for although Garmin has HRM too)
– you’re not too focused on super accurate distance readings (if you use S3 Stride sensor) although Polar also has a G3 GPS sensor too
– you want to count your cadence
– you’re a techy (very complicated to learn, but worth it)
– you’re all for analyzing a lot of data
– you’re a PC-user (Polar software doesn’t run on mac—grrrrr!—but this was something I felt I could overlook considering all the other features)
– you want a friendly and accomodating local service center (Hi Hitler!)
– you want a watch that will last you over a decade (This was one major reason which led me to switch.  Even if the Polar is more expensive than the Garmin, it is still offers more value for money considering it won’t die on me in the next couple of years.)

So, what did I buy?  Introducing my new toy…

The Polar RS800CX Pro Team Edition

IMG_1018

The Polar RS800CX PTE is Polar’s newest and limited edition watch in the market.  It differs from the other Polar RS800 watches—Polar RS800CX Run, Polar RS800CX Bike, Polar RS800CX Multi, Polar RS800—in that it is shiny, not matte, and it comes with complete bike accessories.  I opted for the PTE, well, because it looked irresistibly handsome, and I thought I’ll eventually use it on my bike anyway (when I do get serious with my cycling).  I then purchased the Polar S3 sensor (P8,795) for running.  

IMG_1016
– Everything else that came with the watch –

IMG_1017
– Polar S3 Stride sensor –

Although the purchase was quite pricey (that’s why I shut my eyes the entire time and ran my worries away in Ultra right after), I took comfort in the fact (or my rationalization) that, in the long run, choosing a Polar offered better value for money as the watch will be used more often (even when I’m not running) and for a longer period of time.

I’ll be taking my new toy out for a spin tomorrow morning.  I’m hoping I made the right decision with the big switch.  Goodbye Garmin, Hello Polar!

Click here and here for more info about the Polar RS 800.

POLAR is available at:

Sports Resources Inc.
143 Pasig Blvd.
1600 Pasig City
671-9765/ 671-1563/ 671-9768 to 69

Runnr
Bonifacio High Street

Nike Sportsband 2.0 Out Today!

Saturday, 15 August 2009  |  Gear + Gadgets

I have had a love/hate relationship with the Nike+ Sports Kit and Nike+ Sportsband.

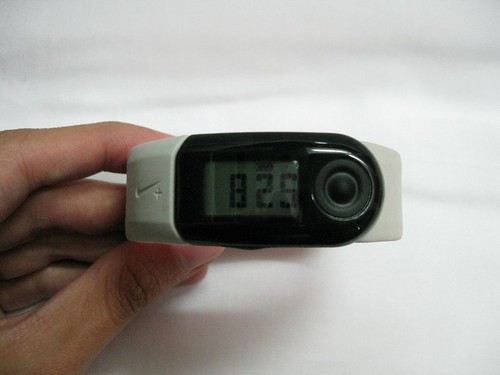
Way back in 2007, the Nike+ Sports Kit (used with the ipod Nano) was my first foray into the world of high-tech running gear. It got me hooked into tracking my distance, pace, time, and calories to help improve my performance. Shortly after, I got my Garmin Forerunner 305 and enjoyed the accuracy of GPS-based information, so the Nike+ Sports Kit was shelved.

In 2008, the Nike+ Sportsband was launched shortly before the Nike Human Race. I was impressed with the new sleeker look, however the product fell below standards due to problems with the screen and water-resistance. I went through three Nike+ Sportbands before I gave up on it completely.

Last June, I was one of the few who got my hands on the new and improved Nike+ Sportsband 2.0 even before it was released in the global market. Honestly, I was quite apprehensive about giving it another try. But, I’m glad I did.

IMG_0971
– Gray/Pink Nike+ Sportsband 2.0 –

Sportsband
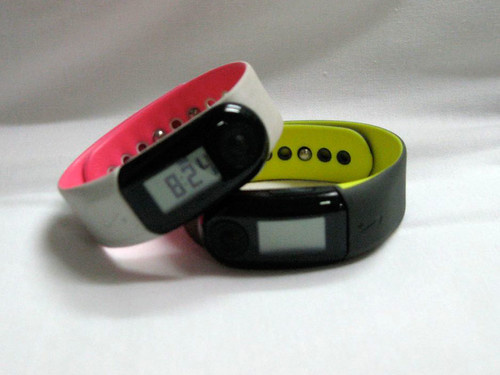
– Nike+ Sportsband 2.0 now comes in other colors –

Since I got the Nike+ Sportsband 2.0, I used two watches in my succeeding runs whenever possible: I wore the Garmin on the left wrist and the Sportsband on the right. Hence, I was able to compare the data retrieved from both.

Initially, I had problems calibrating the product. Below are results from Garmin Forerunner 305 and an uncalibrated Nike+ Sportsband:

GARMIN FORERUNNER 305
1:12:45 min | 10.7km | 6:50 min/km | 635 calories

NIKE+ SPORTSBAND (UNCALIBRATED)
1:12:20 min | 15.97km | 4:31 min/km | 885 calories

Last I checked, I wasn’t elite level status, so the 4:31min/km is definitely wrong. The variance of over 5 km in distance is disappointing. However, when I finally got to calibrate the Sportsband, it produced more credible results for the Run for Home race:

CHAMPION CHIP (OFFICIAL NET TIME)
2:11:19 | 21:24km | 6:11 min/km

NIKE+ SPORTSBAND (CALIBRATED)
2:11:09 | 22.45km | 5:50 min/km

SCREENSHOT-GLOBE
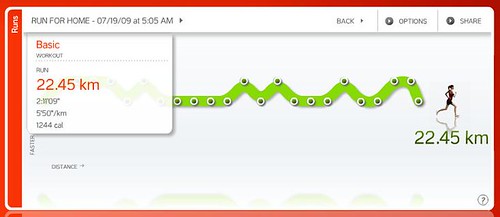
– This is how my Run for Home stats looked on the Nikeplus site. Splits for every kilometer are recorded –

And for a long, slow training run with friends:

GARMIN FORERUNNER 305 (OF JUNC)
2:09 | 18.5km | 6:58 min/km

NIKE+ SPORTSBAND (CALIBRATED)
2:09 | 19.29km | 6:41 min/km

For both long distances, there’s a variance of +/- 1km in distance—not negligible, but not that bad either.

Since my Garmin died a couple of weeks ago, I have been relying solely on the Nike+ Sportsband 2.0 for tracking my runs. Needless to say, road testing this product for over two months—comparing it with another watch and using it solo—has allowed me to give you an honest and comprehensive review of the product.

[PROS]

  1. Sleek and simple. The new Nike+ Sportsband 2.0 looks the same as its predecessor: a sleek sportsband that’s as light as a feather.
  2. Variety of colors. While the old Sportsband came only in black with an interior dark orange, this new sportsband comes in different color combinations: grey with an interior pink band, anthracite (dark grey) with a yellow interior band, and black with a red interior band.
  3. Brighter screen. The screen has a white background so it’s easier to read stats while running.
  4. User-friendly. Plug and play, folks. Just charge it, put the sensor into your shoe, and use it for a run.
  5. Faster connection with the sensor. It connects with the sensor faster than you can say “Nike”.  No more long waits like the Sportskit.
  6. More accurate. I was extremely disappointed with distance readings in the sportskit and first sportsband. That explains why I shelved it before. While the Nike+ Sportsband 2.0 is still not the most accurate sportswatch around, it still gives you a fair reading of the distance.
  7. Long battery life. Battery could last over 10 days without recharging via USB.
  8. Water resistant. I ran over a handful of times with this under the rain. It survived! I just don’t think you’d want to try dipping it in water.
  9. Affordable. Good value for money with a cost of P3,295.  Price is reasonable compared to double digit spending for other running watches.
  10. Online community. As in previous Nike+ products, the Nike plus community where you can upload your runs, view your goals and achievements, and challenge others online is a big plus.
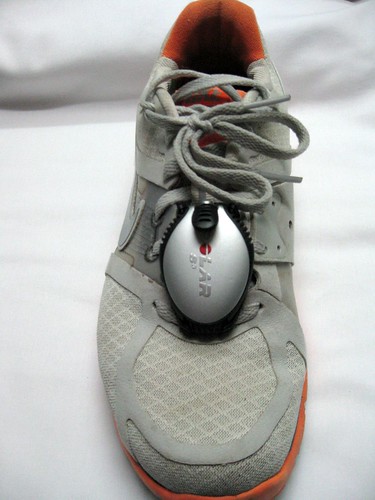
  11. Small and convenient sensor.  The sensor hasn’t changed, and that’s a good thing.  

 
IMG_0975
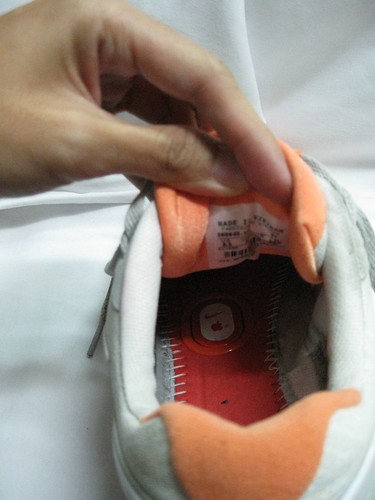
– Sensor fits into a slot in Nike+ ready shoes underneath the insoles –

IMG_0974
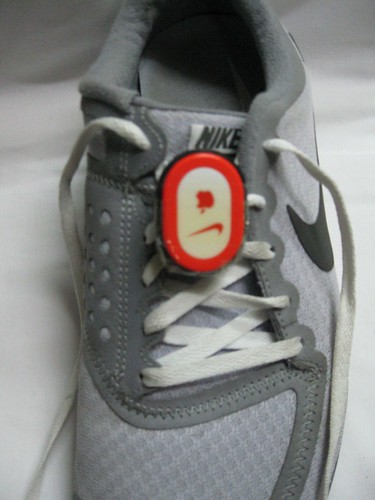
– Sensor can also be attached to a non-Nike+ shoe using readily available gadgets sold in the market. In this photo, I’m using the SwitchEasy –

[CONS]

  1. Not the most accurate pace. My pace readings were off the charts. Based on effort, there were times I felt like I was running 5:45 min/km while pace would read 6:15 then jump to 3:40 without me changing pace!
  2. Color smudges. I got the gray/pink band. After a few uses, the pink smudged over the gray area probably due to sweat or rain.
  3. Single data per screen. Coming from a Garmin which shows you up to 4 data screens, seeing just one (either time, distance, calories, or pace) onscreen was frustrating.
  4. No current time while running. Time of day can only be read when the Sportsband isn’t being used to track a walk/run.  Maybe they’ll address this with the 3.0?

Overall, the Nike+ Sportsband 2.0 is an improved version of its predecessors. Nike successfully addressed major concerns such as accuracy, screen visibility, and water-resistance. While I still wouldn’t place this in the same league as the Garmin or Polar, this watch is a fairly good entry-level watch for beginners.

NIKE SPORTSBAND 2.0
Released in the market: August 15, 2009 (Today!)
Available at Nike stores
Price: P3,295